Showing posts with label 3D. Show all posts

Friday, September 23, 2011

MDS Blog Hop...Week 8


Hello Stampers - 

Sorry for getting my post up so late this morning. We had a really busy night and I was just too exhausted!

This weeks theme is ORGANIZATION. Hmm....that one stumped me...I could USE some organization, as I am so NOT. LOL

So instead, I did a quick Halloween treat for Jacob's Class. We have a NO FOOD rule (bummer) for celebrations...so I decided to use the new 1" x 8" Cello Bags in the Holiday Mini to package up Halloween Pencils! Super cute! These bags are AWESOME. Perfect for candy, pencils, and all kinds of fun treats! And at a price of $2.50 for 50 of them, you can make an adorable treat without breaking the bank!


And here is a close up of the tags themselves. So fun and FAST to make using MDS!


One of the downloads last week was Spooky Bingo Bits. I LOVE that set and quickly purchased it! It's such a cute set and it fits inside so many of our punches! And now that we have it digitally, well, the possibilities are endless! There are 24 cool Halloween images in this set, and the cost is only $7.95!

Here is a quick tutorial in case you are new to MDS and want to learn how to make these:


Thanks for stopping by today! Make sure to visit the other ladies listed below!


Next Blog Hop Stops....


Saturday, September 17, 2011

List, Lists and More Lists!

I found a super cute and fun idea to make for the girls on my team. We have a meeting this morning and we are going to stamp and eat and share, and eat....LOL. You get the idea.
I always like to make a little something extra or have a give away ...just something to show how much I appreciate and adore these ladies. We have a lot of fun together!

So anyway, back to the project. I used our new Holly Berry Bouquet Designer Series Paper to cover these list pads...take a look...


The pads themselves measure about 2" x 8". Perfect size for list making! Our stamping portion of the meeting today is related to anything from the Holiday Mini, so I went with the Christmas theme on these. After all, we ALL have a lot to do around the holidays and I make more lists then than any other time of year. 

Here is a close up of the journal and then a peek at the inside paper. 


Supply List:

Real Red Cardstock - 8 1/4" x 5 1/2"
(score at 2 5/8" and 2 7/8")

Wild Wasabi Cardsotck - 8" x 2 3/8"
Stripe and Wasabi DSP - 4" x 2 1/4"

Stamp Set: Pines and Poinsettias, Tiny Tags (Merry)

Ink: Chocolate Chip, Wild Wasabi, and Real Red Stampin' Write Markers

Accessories:
Red Glimmer Paper, Chocolate Chip Scallop Ribbon, Holly Berry Designer Buttons, Linen Thread, 1 3/8" Circle Punch, Scallop Circle Punch, Stampin' Dimentionals, Glue Dots, Sticky Strip

Thanks for stopping by today! I hope you have an awesome weekend!


Monday, August 15, 2011

So much more than just scrapbook pages...

WOW! Every time I turn around I am learning something NEW about My Digital Studio! To call it a digital scrapbooking program seems unfair! It does SO much more!

Yes, scrapbook pages and photo-books...in a variety of sizes...12x12, 8 1/2x11, 8x8, 6x6 and 5x5....
And cards in a ton of sizes too...

and tags, and swatchbooks...and JOURNALS?

Yes my friends. Journals. Gorgeous, awesome quality journals.

You design the front, the back and the spine...
and then send it off to be printed by Stampin' Up!'s professional print service.

And in about a week, your one of a kind, custom, unique Journal arrives at your door.

The journal is 6 1/4" x 8 1/4" and comes with 80 pages of double sided lined paper. WOW!

So, I finally sat down and designed one today!
I can't WAIT to get it! Perfect for back to school.
I used the upcoming Spice Cake Designer Series Paper (it's coming in the Holiday Mini Sept. 1st).
Oh, it's soooo pretty! Love, Love, LOVE that paper!

So here is what my journal looks like:


Isn't it pretty? I love that you can actually SPONGE the edges in MDS...or at least give the illusion of sponging! I kept the cover plain because I used a lot of the patterned DSP and I didn't want it to be too busy. 

So there you have it...
my one of a kind, custom, unique Journal. 
And I put my name on the cover, so there is NO question of who it belongs to! LOL

Thanks for stopping by today! I hope you have a great day! Please visit again soon!


Monday, May 2, 2011

Teacher Appreciation Day!


Today May 3rd, is Teacher Appreciation Day! I have been working in my stamp room on a project for Jacob's teacher that I think (hope!) will be meaningful and that she will enjoy.

I saw somewhere a long time ago (on another blog...?) a clever idea for a journal. This is a special journal, because with it come a jar full of questions about teaching. The idea is that the teacher pulls one of these questions out of the jar each day, and attaches it to a page in the journal. Then she would write about it. When she is done, she will have a journal that has captured her teaching story! Love this idea!

So, I took a crack at it. I bought the clear jar at Walmart, then used My Digital Studio to create the label for the outside. I don't know if you can see it, but it reads "Mrs. Bruschino's Journal Jar".


And I also bought a journal to match but I spruced it up with some ribbon and a little stampin' and a button....


I also made a set of notecards...because that IS what I do after all...and what teacher doesn't need notecards? I made 10 of them and sealed them up in these wonderful clear boxes and tied them up with some pretty ribbon.


I put everything in a basket...with a thank you note of course.


I hope she will enjoy writing about her journey to becoming a wonderful teacher. :)


One other thing I wanted to share is my love of photography. I bet you didn't know that I have always been a photographer. I had done a lot of portrait photography before marriage and kids...in fact, I was also photographing many wedding. I had a darkroom, and did a lot of black and white developing.

Well, life moves on...and you get busy and you put aside certain things. Digital photography is so prominent now. I have a lot to learn about digital editing! WOW! It seems the only thing I manage to take pictures of these days is cards! Crazy! There is a big beautiful world out there!

So I am throwing myself back into photography...and I am really excited about it. I want to focus on landscapes (because I suck at them, and I don't want to suck at them). My love has always been portrait photography though.

So ironically my friend Kimberly is also bitten by the bug...
and we have been talking not just about stamping but more about photography! LOL.

We have started a new thing today - 365 pictures.
We each take a picture everyday and we share it with eachother. We have to shoot in manual - which is a challenge as well!

Here is my first picture. Nothing earth shattering...just a plant. But I wanted to use natural light and the color of this plant just draws me in.

So, it's just day one. And I know I have a lot to learn. They will get better. Promise! :)

Have a great day and thanks for stopping by -


Sunday, January 23, 2011

Candy Wrapper Die is AWESOME!


I bought the Stampin' Up! Exclusive Candy Wrapper Die For the Big Shot last October. Well, I haven't used it much in the past. But I have a meeting with my team this weekend, and I wanted to make them each a little treat to show them how much I love them (they are awesome ladies!).

So, I pulled out the die and got started playing with it. It's so cute! I fit some Hershey Kisses inside (cause you gotta have a little chocolate while stampin'!). I cut the die out of Real Red Cardstock and used the new Love Impressions Designer Series Paper in the Occasions Mini catalog.

This die comes together pretty easy since not only does it cut, but it also scores all the lines for you. So all you really have to do is fold and adhere the ends with Sticky Strip and decorate!


I also used the new Red Glimmer Paper on this project for the little heart. You MUST get this paper. It's so AWESOME! Pre-glittered, no mess! I also used the rub on's for the XOXO tag.
I tied up the ends with the White Grosgrain Ribbon.

Here they are in a basket ready to give to my girls tomorrow! I hope like them because I sure had fun making them!


Have a great Sunday!


Tuesday, September 21, 2010

Tags Till Christmas


Have you seen this new set, Tags Till Christmas? It's in the new Holiday Mini. It is SO CUTE!
And the best part is (of course) Stampin' Up! has all these wonderful punches to coordinate with each image. Making Holiday Tags will be easy-peasy lemon-squeezy this year!

Here is a project I made to give to one of my workshop hostesses.


How cute is that?

So here's how you make this...

Take a 6x6 scrapbook page protector and carefully trim the edge with the holes (we don't need that part). Then I cut a piece of Always Artichoke Cardstock to 6 1/4" x 8 1/2".

Using Sticky Strip, I adhered the page protector to the Artichoke Cardstock. I then folded over the top piece and gave it a pretty edge with the Scallop Punch. I then punched another piece of Brushed Gold Cardstock( 6 1/4" x 2") with the scallop punch, and adhered it under the flap - so you have a double layer of scallops on the flap. Pretty!

Here is an open view. You can see that I used a Velcro Dot under the flap. That is how it stays closed.


Now the sticky strip is visible through the Page Protector...SO, I cut a 6x6 piece of Deck the Halls Designer Paper and slipped that inside the page protector. You can see the design of hollys and berries behind the tags. And since all of Stampin' Up! products coordinate, it really matches well and ties is all together.

I inked the stamps in Cherry Cobbler and Always Artichoke and punched with our coordinating punches. I tied them up with gold cord and some of our 1/8" ribbon.

Now the bow on the flap is our new Cherry Cobbler Seem Binding Ribbon in the Holiday Mini.
I punched 2 holes in the flap, and threaded it through. I then simply tied a bow.

There is a little tag on there...and that uses the Tiny Tags stamp set and the coordinating Jewelry Tag Punch. So tiny, so cute!

Here is a close up of the bow and tag:

I am trying to see if I can squeeze a date onto my calendar to make this a class. Wouldn't that be fun to come make this? Stay tuned, as I am trying to get a few more classes in before the end of November.

Have a great day! It is gorgeous out today!
Thank you so much for stopping by!


Thursday, August 26, 2010

Wrapping It Up - Stampin' Up! Style


Hello Friends,

Today I want to share something OTHER than a card.

Shocking, yes, I know. But these little rubber stamps can do SO much more than just create amazing greeting cards. With Stamps, Inks and Papers, you can do so many wonderful things.

For example, I had a special gift for a friend last week. Well, she is SO special, that no ordinary wrap that you buy from a store would do. Nope. So, to give something extra special, what do you do? Well, you make it yourself, of course!

I had a plain white gift bag on hand, and that is where I started. I cut a few inches off the top to get rid of the handles. Then I measured the front of the bag, and cut my cardstock the same size to cover it. The layers I cut about 1/4" smaller so I would have a small border. And then I started stamping. I did the same for the back, but added a few inches to the height so that I could fold it over and create the closure flap.

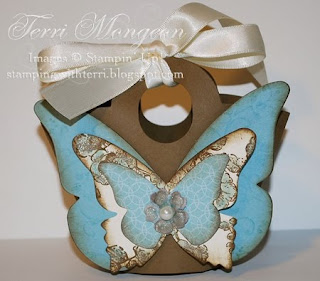
Here is what it looks like all completed:


I used the Just Believe Stamp Set (in LOVE with it!) and used Pear Pizzazz Ink (my NEW favorite) to stamp the images on the Whisper White layer. The butterflies are cut from the Beautiful Wings Embosslit Die. So cute! I just attached them with glue dots. They look awesome floating off the bag!

The flap was punched with the Eyelet border - I added a 2nd layer under there to add a little more color - so you have Daffodil Delight and Pear Pizzazz eyelet border. I then used a velco dot for the closure.

I punched 2 holes in the top of the bag and threaded it with Basic Black Satin Ribbon, and then added bows in Pear Pizzazz Ribbon. Super cute!

Now for the tag. The tag was SO fun to make! I used the Big Shot and my Serif Alphabet set and die cut the initial out of chipboard (the Big Shot cuts Chipboard like butter!).

I then inked the initial with versamark ink, and sprinkled it with Heat and Stick Powder.
I heat it with my embossing tool until it melted, then quick sprinkled on our AWESOME green Cosmo Glitter. It matches the Pear Pizzazz perfectly!

Here is a closer look:

The benefit to using the Heat and Stick powder is that the glitter is very controlled. It won't flake off or get on everything else. It's great to use when you need the glitter in a very specific or small place and don't want it all over the rest of your project. Plus the initial is about 2" in size, and I wanted really good BLING coverage on it. I doubt that the 2 way glue pen (which I use on cards when adding glitter) could have handled the job.

One tip when making these bags - definitely use Sticky Strip when attaching your cardstock to the bag. The cardstock layers are heavy (if you are using awesome Stampin 'Up! Cardstock that is) and you want to make sure it's really stuck on there. You don't want it falling apart on you.

Thanks for stopping by today! I hope you have a great weekend!

Sunday, August 15, 2010

Elements of Style Portfolio


Tomorrow I am headed out with some friend in the evening, and I wanted to make a little something for the hostess's home we are going to.

I haven't made a portfolio in quite awhile, so that is what I decided on. I reached for my favorite, Elements of Style (again). I think it may end up in the LOVE FOREVER and TIMELESS Category along with Roses in Winter. :0)

Anyway, I spent most of today playing around and water coloring these beauties. I get a little lost in my own world with Aqua Painter in hand...LOL. I could do it for hours.

Here is the portfolio closed.


And here it is open with the cards on the inside.


I used the Early Espresso stripped ribbon to tie it closed. I love that ribbon. It is super quality and ties beautifully!

Here is a close up of the watercolored roses. So pretty!


Inside are 4 cards. I created two different designs.


I have had someone ask me if I would do a class on this. I guess I would if there were interest.
So readers....is this something you would like to attend a class for? If so, leave me a comment or email and I will get it scheduled if the interest is there.

Thanks for stopping by today! I hope you had a great weekend.
And if you haven't signed up for any Christmas classes yet, don't delay. Most of them only have 2 spaces left!

Stamp Happy ~


Monday, July 26, 2010

Bitty Butterfly Basket and Note Cards


Ok, is this not the cutest thing ever?


This is a bitty basket made with the Baskets and Blooms Die for the Big Shot. The butterflies were all made with the Beautiful Butterflies Die Cut. These dies are exclusive to Stampin' Up!, so you won't find them anywhere else. The butterflies were stamped with Elements of Style Stamp set. I adore that set. Everything looks AMAZING with it!

I used Soft Suede, Very Vanilla and the new Elegant Soiree Designer Series Paper. I made adorable little note cards to fit inside the basket. They are tiny, but oh so cute. Perfect for a little note to someone to say I love you, Miss you, or just Thinking of you. :)


This will be on display at our New Catalog Stamp Camp on July 31. I will have a date selected buy then as I will offer this as a class. :)


Thanks for taking a peek! Hope you had a great weekend!


Sunday, February 28, 2010

Hostess Gift

Today I have a workshop in my home with a great customer and friend. She books with me every year during Sale-A-Bration, and she always earns a ton of free stuff. :0)

I like to make a handstamped gift for my hostesses. Sure, they get many wonderful rewards from Stampin' Up! for hosting, but I want to show my appreciation, so I like to take the time to make them something special.

Here is what I came up with for today.

This is a card portfolio - when you untie and open, holds 4 stamped cards and the matching envelopes on the inside.

Here is a peek at the inside.


I used Vintage Vogue to stamp the outside of the portfolio. The inside uses the Great Friend Stamp Set. I also used the Beautiful Wings Embosslit Die to cut and emboss some awesome butterflies on her cards. The cardstock colors are Rich Razzleberry and Old Olive. I tied it together with the Cottage Wall Designer Series Paper (my fav! It's gorgeous!) and the Rich Razzleberry Polka Dot Ribbon.

I am looking forward to a fun afternoon of stampin' with these gals today. I hope she likes her gift!

Have a great Sunday and thanks for stopping by!

Wednesday, December 16, 2009

Stampin' Up! Treat Boxes...

...are so adorable and easy peasy! They come flat, you just fold together and viola!

I packaged up some treats for my neighbor who helped me out in a pinch a few weeks ago...so I wrapped the contents in a cello bag with pretty ribbon. And then I used the Stampin' Up! exclusive Two Tags Die (which is on SALE right now along with many other Big Shot dies!) to make this adorable tag. The snowman I put together with punches. Isn't he cute?

Here is a close up of the tag:

I love making gifts for people this time of year. Yes, it takes a little time, but you can't put a price on giving a gift that you hand crafted. You can't buy that in a store, and it's much more cost effective. This year, use your hands instead of your wallet. :-)
Have a great day everyone! Thanks for stopping by!

Tuesday, December 1, 2009

It's All About the Packaging...

So every year, my best friend Eileen and her Mom do an Annual Cookie Swap at the holidays. This is always a source of many hours of work. In other words, it's a big, fat hairy deal.

We always have to make between 12- 14 dozen of cookies. We make one dozen for each person in attendance, and one dozen extra for the party for us to eat.

We also do a grab bag, play some games, and it's just a really fun time. I look forward to it every year. It's a big girl event only, so no kids. I look forward to seeing all the gals that I haven't seen since the last cookie swap.

So, here's the thing...I can bake pretty good. Some years my cookies are better than others. Some years, they just suck. But for me, the cookie swap is more of a time to use my CRAFTING skills, rather than my baking skills. I am always wondering how I am going to package the cookies in a way that will be adorable. No cello bags with santa's on it from WalMart for me. Nope. It's got to be crafty and something you can't buy. I spend a lot of time each year trying to come up with something cute, and just a little better than last year.

I thought this year I wanted to make a house of some sort, and after playing around all week with loads of ideas, here is what I came up with.


This is made from a plain white gift bag. I cut the top part with the handles off, and covered the front and back with Kraft Cardstock (definately use sticky strip top adhere it so it doesn't come off). Then I cut another piece for the roof. The back of the roof adheres with Sticky Strip, but the front has velco closures so you can get into the bag. I punched 2 holes in the top of the roof and put in 2 Jumbo Pewter Eyelets. I then threaded the 5/8" Chocolate Chip ribbon through the eyelets and tied on the inside.

I stamped the snowflakes on front and back with White Craft Ink. The tree and bird are from the Season' of Friendship Stamp Set. The windows were made with punches. The red piece is 1.5" square, the Chocoalte Window is the 1 3/8" square punch. And the 4 little craft windows are 1/2" squares.

The door is simply a 2" x 3" piece of Kraft cardstock, sponged on the edge with Close to Cocoa. A Chocolate Chip Jumbo Brad acts as the door knob. The small heart is the smallest heart from the Heart to Heart Punch. The snow is simply a strip that I tore by hand, I added 2 way glue across the top and topped it off with Dazzling Diamonds Glitter.


The label "From Our House to Yours" was made for this project! It's from the Sweet Season Stamp Set. I stamped it in Chocolate Chip and colored the heart in with a Real Red Marker. It gets punched out with the Large Oval Punch.

I then punched 2 Real Red Scallop Ovals, and adhered them to the Wide Oval to make a background. 2 Gold Brads added to the sides, and a few Stampin' Dimensinoals, and viola!

I am pretty pleased how it turned out, although it did take me all day to design it. LOL.
Now I just need to find a really good Christmas Cookie Recipe! ;0)
Thanks for stopping by!
Have a great day!

Thursday, November 12, 2009

Gift Giving From The Heart - Decorative Tiles Class

Hello Stampers,

I am sorry I have been away all week. As most of you might have heard (from me screaming here in CT) my email has had some major issues this week. All of the emails I have been sending have disapeared into cyberspace. Comcast is still working on it, so I hope to have this situation resolved soon! Thanks for being patient!

This is a class I did a few years back and everyone loved it so much. Since then I have gotten many more requests on when I would have another. So, just in time for the Holidays....here we go.

We will make these four 6x6 tiles in this class using Stampin' Up! Inks, Ribbons and Embellishments. These designs are inspired by my good friend and fellow demonstrator, Kimberly VanDiepen. She is such a wonderful person, and we always share ideas to help eachother out. So, thanks girl!


In uncertain times, when we are trying to get by with less, giving gifts that are handmade are not only cost effective, they are true expression of love and caring.

Instead of buying gifts, make them! The recipient will cherish that you took the time to make a gift instead of buy one. :)


This class is offered on 2 dates...

Thursday, December 3rd at 10:00 AM
and
Friday, December 11th at 6:30 PM.

There are 6 spaces available in each class.

Class fee is $25.00

What to bring: A Smile! :0)

NOTE: these tiles are decorative use only.

If you are interested in attending, please email me at Stamp4joy@comcast.net

Thanks for stopping by today!

Stamp Happy,