Showing posts with label BIG SHOT. Show all posts

Friday, March 25, 2011

Fun Flowers are Fabulous!


The Occassions Mini Catalog is loaded with so many amazing products. I feel like I hardly have time to use them ALL. But one of my favorite is the FUN FLOWERS die for the Big Shot.
Oh my GOSH! I LOVE LOVE LOVE these flowers.

This die cuts out 3 flowers at the same time. They are all different sizes and shapes - perfect to use individually or layered together, as I did on this card.


I embossed the largest flower with the Vintage Wallpaper Embossing Folder, the sponged it with Soft Suede ink. The medium flower was stamped with the En Francois Background Stamp, and again sponged. I used our AMAZING Shimmer Paint in Champagne on the smallest flower. It adds such pretty shimmer to the product! Gorgeous!
I finished it off with a ruffled piece of Baja Breeze Seam Binding Ribbon and a Vintage Brad.
The background is embossed with the Tulip Frame Embossing Folder.

Another fun thing to try is using different papers for the flower layers...cardstock on one, designer paper, and maybe even tissue paper or fabric on the others. Layering different material together will add such amazing texture to your projects.

We are off to New Hampshire this weekend to visit with Ed's family. The kids are excited to see their Aunt and Uncle. And Bella will be off having a rumpus with her puppy friends. :)

I am working on my April calendar, as I didn't really have anything this month. I apologize...many of you have asked about it! I was just super busy with the Stampin' Up! Regional and prepping for my presentation (it went really well and I had a lot of fun!).

Thanks for stopping by today! Enjoy the weekend!

Saturday, January 22, 2011

Letterpress LOVE


This morning I gathered with my downline for a team meeting. What a fun way to start the day! It is so much fun when we all get together! I was happy to have 2 of my newest team members in attendance.

We always stamp something at our meetings - after all, we are all there because we LOVE to stamp. Here are a few pics of the gals having fun stamping...

This is Lori, she joined our group in November. Doesn't she look so happy to be stamping? LOL
She is very creative and a great stamper. It took me a few years to get her to join me..SO glad she finally took the leap! :)
And this is Bonnie - she is a doll and a wonderful stamper. She has been on our team for a few years now. And the bonus is now that she is retired from her day job, she has lots more time to stamp! :)


I wanted to show everyone how to use the new Letterpress Plates for the Big Shot (you can find these in the Mini Catalog).

It's similar to the other embossing plates, but we put CRAFT ink on the plate , lay the paper on top of the plate, then run it through the Big Shot.

Here is a video that Stampin' Up! made to show step by step how to use the letterpress plates. Its awesome!


Everyone did a great job with their project! Here is the completed card:


We used a brayer to apply the red craft ink to the plate - it worked great. The letterpress debosses the image, and the craft ink gives great coverage. Love it!

The ribbon is the 1-1/4" stripped grosgrain ribbon that I cut in 1/2 - so very cool as then I frayed the edges. We added a little love tag with some linen thread, and punched a heard from the new Red Glimmer paper.

Thanks so much for stopping by today! Enjoy the rest of your weekend!


Thursday, December 9, 2010

Peaceful Season

Here is a card that we did at my Christmas Stamp Camp last weekend. I cased this card from another wonderfully talented demonstrator, Catherine Pooler.

The stamp set is called Peaceful Season, and it's a Level 2 Hostess set in the Holiday Mini. I just LOVE the elegant script font on this. There is another greeting in this set with the same font that says Peace on Earth.


It's a pretty simple card, but we used the Big Shot a lot on this one!

The Old Olive base is embossed with the Petals A Plenty embossing folder.
Then we have the greeting that is stamped in Cherry Cobbler ink on a Top Note Die Cut.

The finishing touch are those delicate snowflakes which are made with the Northern Flurry Die Cut. I just love that die! It cuts out a bunch of snowflakes all at once and they are all different shapes and sizes. The only part I don't like it popping out all the little pieces from inside the snowflakes, but it is totally worth it in the end.
The snowflakes all have a Basic Rhinestone in the center just to add a touch of bling.

Thanks for popping in today! I have lots more holiday ideas to share with you. My only problem is finding the time to sit down and write my post! LOL

Have a great day,

Monday, July 26, 2010

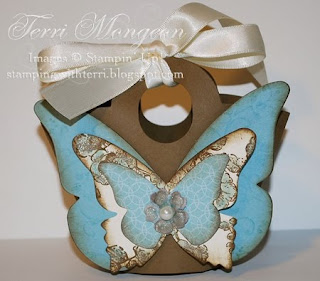
Bitty Butterfly Basket and Note Cards


Ok, is this not the cutest thing ever?


This is a bitty basket made with the Baskets and Blooms Die for the Big Shot. The butterflies were all made with the Beautiful Butterflies Die Cut. These dies are exclusive to Stampin' Up!, so you won't find them anywhere else. The butterflies were stamped with Elements of Style Stamp set. I adore that set. Everything looks AMAZING with it!

I used Soft Suede, Very Vanilla and the new Elegant Soiree Designer Series Paper. I made adorable little note cards to fit inside the basket. They are tiny, but oh so cute. Perfect for a little note to someone to say I love you, Miss you, or just Thinking of you. :)


This will be on display at our New Catalog Stamp Camp on July 31. I will have a date selected buy then as I will offer this as a class. :)


Thanks for taking a peek! Hope you had a great weekend!


Sunday, January 24, 2010

Stamp Camp Sample

As promised, here is another card we made at Stamp Camp on Saturday. My stamp room was all a bustle with two back to back camps. Everyone seemed to LOVE the cards and a great time was had by all.


I just love this card and layout! It features the new 2-Step Bird Punch. When I first saw this punch in the mini catalog, I wasn't wild about it. But then I went to Leadership and saw tons of awesome samples, and I fell in love! It punches the branch, bird and wing all at once!

We used the Elegant Bouquet embossing folder to emboss on the Rich Razzleberry piece. The Designer Paper is Cottage Wall, and it's just soooo pretty! The border punch down the side is the Scallop Trim Border Punch and it's one of the FREE offerings during Sale-A-Bration.

The bird piece flaps open to reveal a white piece underneath to stamp a greeting or jot a quick note. I love cards that feature a cool fold!

To make this card:

Rich Razzleberry - 5 -1/2" x 4 -1/4"

Cottage Wall Designer Paper - 5 -1/2" x 3"

Orchid Opulance Cardstock - 5- 1/2" x 1"

Layer pieces for the Bird:

Whisper White - 2- 1/2" x 2- 1/2"

Rich Razzleberry - 2 - 3/4" x 2-3/4"

Old Olive - 3" x 3"


Directions:

  1. Emboss the Rich Razzleberry Piece using the Elegent Bouquet Embossing Folder and the Big Shot.
  2. Fold the strip of Cottage Wall Designer Series Paper in 1/2 legth wise. Attach to the back of the Rich Razzleberry Cardstock.
  3. Scallop the edge of the Orchid Opulance strip and adhere underneath the front piece of the Cottage Wall Designer Paper.
  4. Punch bird, wing and brach using the 2 step Bird Punch.
  5. Adhere branch to the Whisper White Piece.
  6. Sponge bird and wing with Rich Razzleberry Ink. Adhere together.
  7. Attach bird to branch with Stampin Dimensional.
  8. Attach bird piece to Rich Razzleberry and Old Olive layers.
  9. Adhere to front flap.
  10. Inclue a 2-3/4" x 2-3/4" Whisper White piece on the inside to stamp greeting.

As you can see, this card is EASY PEASY! You could crank them out in no time at all and they are super cute. My stamping friends LOVED them yesterday!

To shop online, click here. And remember, it's Sale-A-Bration time! Every $50 order gets you FREE STAMPS, PAPER or TOOLS! :)

Have a great day!

Wednesday, January 13, 2010

A Quilters Dream Come True

Our final moments at Leadership were SO exciting! Shelli presented an award to fellow Demonstrator, Jill Olsen for her efforts in blazing the trail with the Big Shot and our die-cuts into the textile industry.


She showed off all the incredible quilts and fabric things she has made and the amazing work she has done blending our products into the world of fabric. As a side note - did you know you can cut 8 layers of fabric with the Big Shot?? Not being a seamstress, I had no idea!


My dear friend, Lisa Freeman, had already taken the leap into textile with her Big Shot, and made me the cutest tote bag! I carried my card swaps in it, and people stopped me all through the conference to take pictures of the bag. She used our Scallop Square Die Cut and the Flower Folds Die cut. Isn't this the cutest thing ever????


Here are a few more pictures; a close up of the flower and the back of the bag:


The Big Shot is the only die cut machine that can cut through fabric! What a dream come true for Quilters who normally have to cut the squares out by hand. The Big Shot is a HUGE time saver!


Here are some of the quilts that were on display at Leadership. These were all made using the Big Shot and Stampin' Up! dies! Aren't they beautiful?


If you are a quilter, or know someone who is, make sure to forward this post to them! I would be happy to do a quilting workshop for anyone who is interested in learning how the Big Shot can make quilting easier and faster. :)

Have a great day!