Thursday, August 26, 2010

Wrapping It Up - Stampin' Up! Style


Hello Friends,

Today I want to share something OTHER than a card.

Shocking, yes, I know. But these little rubber stamps can do SO much more than just create amazing greeting cards. With Stamps, Inks and Papers, you can do so many wonderful things.

For example, I had a special gift for a friend last week. Well, she is SO special, that no ordinary wrap that you buy from a store would do. Nope. So, to give something extra special, what do you do? Well, you make it yourself, of course!

I had a plain white gift bag on hand, and that is where I started. I cut a few inches off the top to get rid of the handles. Then I measured the front of the bag, and cut my cardstock the same size to cover it. The layers I cut about 1/4" smaller so I would have a small border. And then I started stamping. I did the same for the back, but added a few inches to the height so that I could fold it over and create the closure flap.

Here is what it looks like all completed:


I used the Just Believe Stamp Set (in LOVE with it!) and used Pear Pizzazz Ink (my NEW favorite) to stamp the images on the Whisper White layer. The butterflies are cut from the Beautiful Wings Embosslit Die. So cute! I just attached them with glue dots. They look awesome floating off the bag!

The flap was punched with the Eyelet border - I added a 2nd layer under there to add a little more color - so you have Daffodil Delight and Pear Pizzazz eyelet border. I then used a velco dot for the closure.

I punched 2 holes in the top of the bag and threaded it with Basic Black Satin Ribbon, and then added bows in Pear Pizzazz Ribbon. Super cute!

Now for the tag. The tag was SO fun to make! I used the Big Shot and my Serif Alphabet set and die cut the initial out of chipboard (the Big Shot cuts Chipboard like butter!).

I then inked the initial with versamark ink, and sprinkled it with Heat and Stick Powder.
I heat it with my embossing tool until it melted, then quick sprinkled on our AWESOME green Cosmo Glitter. It matches the Pear Pizzazz perfectly!

Here is a closer look:

The benefit to using the Heat and Stick powder is that the glitter is very controlled. It won't flake off or get on everything else. It's great to use when you need the glitter in a very specific or small place and don't want it all over the rest of your project. Plus the initial is about 2" in size, and I wanted really good BLING coverage on it. I doubt that the 2 way glue pen (which I use on cards when adding glitter) could have handled the job.

One tip when making these bags - definitely use Sticky Strip when attaching your cardstock to the bag. The cardstock layers are heavy (if you are using awesome Stampin 'Up! Cardstock that is) and you want to make sure it's really stuck on there. You don't want it falling apart on you.

Thanks for stopping by today! I hope you have a great weekend!

Wednesday, August 25, 2010

Holiday Mini Sneak Peek!


Hello Stampers!

So by now, you ALL must have received your Holiday Mini Catalogs in the mail. Do you just LOVE it? I can't get over all of the AWESOME new things in there!

If you didn't receive one and don't have a demonstrator already, please email me and I will be happy to send you one. :)

The sales period for the Holiday Mini doesn't start until Sept 1. So, you still have to wait a week before you can order. But lucky me, one of the perks of being a demonstrator is getting the new stuff in my hot little hands before the sales period. It gives us demo's time to work on samples and creative ideas for our workshops and classes before the sales period begins.

I often participate in demonstrator swaps. We each pick a set, and then design our card. We make as many cards as there are people in the swap. This time I only had to make 20. So, we send our cards in to one person (thanks, Diana!) and she "swaps" them out. So we each get one of everyones card. So I send in 20 of my card, and get 20 different cards back. Cool idea, huh?
We demonstrators are always thinking! LOL

Halloween is always a big deal around here. We have an awesome neighborhood, and we do Halloween parties, and have lots of fun. So, natuarally the set I picked was FANG-TASTIC.

I also used the new Spider Web Embossing Folder and the FABULOUS NEW Raven Ribbon. It is black lace ribbon, so soft, easy to work with and tie...and I love it. I hope it sticks around FOREVER. It's just delicious. :0)

Here is my card!
The card base is Rich Razzleberry with a Basic Black layer. I ran the Basic Black through the Spider Web Embossing Folder.

Here is a closer look - very cool! You are gonna NEED this folder...it rocks!


I used the Stampin' Up! Two Tag Die Cut for the Tag. Isn't it awesome? I sponged Basic Grey and Pear Pizzazz ink on the Whisper White layer for the tag. Then I stamped my bat and kitty in Stazon ink and colored them in with a blender pen and Basic Grey ink.

I folded over the top of the tag, and put in a Jumbo Pewter Eyelet. I threaded the eyelet with Basic Black Satin ribbon and then tied a bow with the new Raven Lace Ribbon.

Here is a closer look at the ribbon tied up:


Now for our little witch...I inked her up in Stazon Jet Black, and stamped her on Watercolor Paper. I colored her in using Rich Razzleberry and Pear Pizzazz classic inks. I used the Blush Blossom Marker (thank GOODNESS that is still sticking around) for her face, with some Blushing Bride for her cheeks.

And yes, I really truly cut out all 20 of them by hand. It actually wasn't bad. She needed to be popped up on a few dimensionals. :0)

The greeting "Witch way is the Candy?" was stamped on Pear Pizzazz and punched out using the Modern Label Punch. I added 2 black brads, and added it to the card with a few dimensionals.

And you want to hear something FUNNY about this card? I HATE (with a deep passion) BATS... I am deathly afraid of them (the real ones anyway). And truth be told, I am not a big cat fan, either. I can't say I HATE them, but I certainly would never own one. (Well, I could say that, but I don't want to offend anyone.)

I am a dog person. (insert Bella picture here...)


So anyway, how funny that I chose 2 stamp images of things I don't even LIKE? I mean, who does that? I crack myself up. LOL.

Thanks for stopping by tonight! I hope you are having a great week.

Have a wonderful evening!

Monday, August 23, 2010

Punch Potpourri


Hello Stampers!

Sorry for the lack of posts the past few days. I have been a busy little bee over here working on swap cards for the new holiday mini. One of the awesome things that demonstrators do is organize swaps when we have a new mini catalog or new product.

We each pick a set out of the mini, design a card (and make about 20 of them!) and then we all trade with eachother. It's a lot of fun and a great way to get a lot of wonderful ideas for the new products. I can't wait to see what my stampin' sista's come up with! I will be sure to post my completed creation when I am done.

In the mean time, a special friend had her 40th birthday last week. We had a lot of fun going out to dinner and celebrating. I wanted to make her a special card and I went right to the Punch Potpourri set. This is a hostess set, and I love it. It coordinates with many of our punches. My friend LOVES the bird in the Always Stamp Set, and the bird punch, so I knew I had to use it.

Here is what I came up with:


The card base is Early Espresso, and the Designer Paper is from the Greenhouse Gala pack (the color of this design is Baja Breeze).

There are lots of punches on this card...scallop border punch, boho blossom punch (for the small flower with a brad in the center), Full Heart Punch, XL Bird Punch and the Modern Label Punch for the greeting. Everything was also sponged in Early Espresso to age it a bit and give it a vintage look. That pretty ribbon across the middle is our new Crochet Trim Ribbon and is it every delish! I love it! I even sponged a little ink on the ribbon to make it look antique.

If you want to get your hands on this set (and who doesn't!?) let's schedule a private (free!) class for your and your friends! It's tons of fun and you will earn lots of great product.

Have a great week everyone. Thanks for stopping by!

Wednesday, August 18, 2010

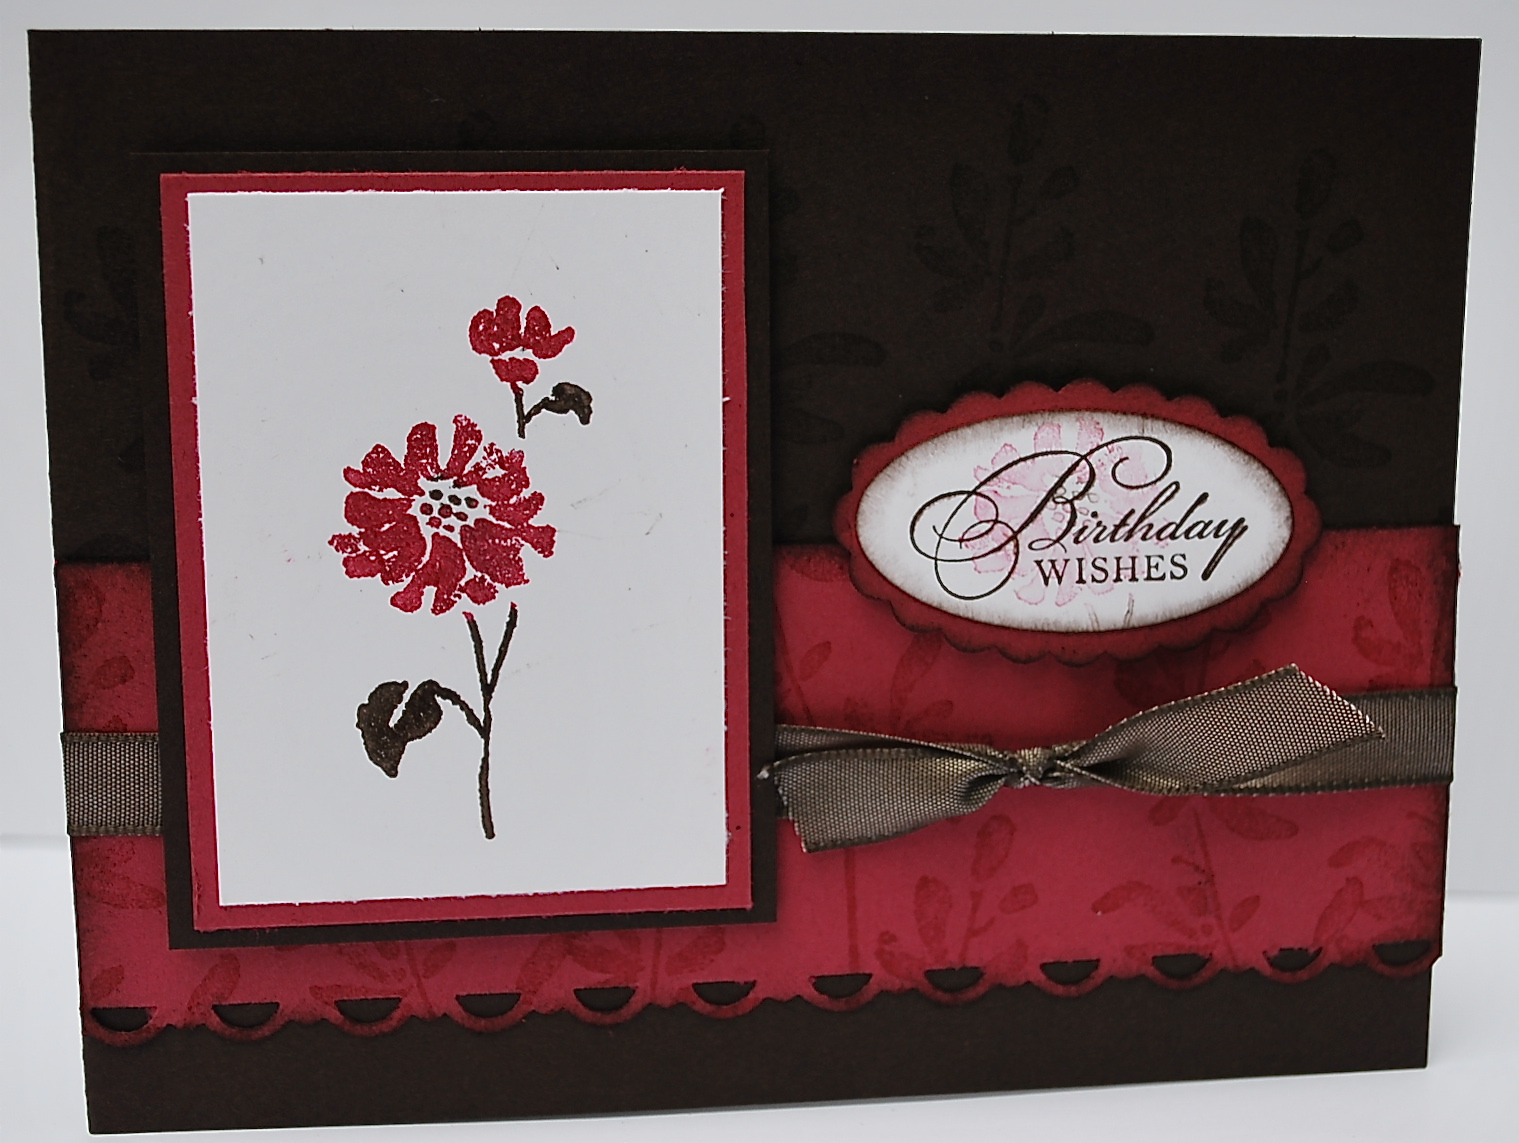
Espresso Watercolor Trio

Todays post is a quick and easy card. using Watercolor Trio. Are you sick of it yet? I think this is the last one that I have to post.

The cardstock colors are Easrly Espresso and Rose Red. Have I mentioned how much I ADORE Early Espresso? It is such a deep, rich brown (darker than Chocolate Chip). It is positively YUMMY and pairs wonderfully with every color. It's the new black (LOL). :0)


I am all about quick and easy these days. The Rose Red piece across the middle was scalloped with the scallop border punch, and stamped with watercolor trio using versamark. Tied across the middle is yummy Early Espresso Taffeta Ribbon.

The main image was inked with our awesome Stampin' Write Markers in Early Espresso and Rose Red and stamped on Whisper White. Then it was layered with Rose Red and Early Espresso Cardstock.

The greeting is so pretty! I adore the script style font on the greetings in this set! It was punched out with the large oval punch and backed with a Scallop Oval punched out of of Rose Red Cardstock.

I hope you are having a great week!

Thanks for stopping by!

Tuesday, August 17, 2010

Watercolor Trio in Razzleberry


Hello All -

Are you sick of these sets yet? I am using them as much as possible before the Summer Mini Comes to and end on Aug 31. I love them!

Here is a real quick and easy one.

Cardstock color is Rich Razzleberry. I ran it through the Big Shot using the Vintage Wallpaper Embossing Folder, then sponged the edges with Razzleberry ink.

I colored directly on the stamp with the brush tip of Soft Suede and Rich Razzleberry Stampin' Write Markers. I then misted with my water bottle, and stamped on my Watercolor Paper.
The little clip at the top is one of our small library clips, tied with a smidge of Whisper White taffeta ribbon. The main image is layered with a piece of Soft Suede Cardstock.

I think my most favorite thing about Stampin' Up! products (aside from the awesome quality) is the color coordination. It takes the guesswork out of it when you ink matches your cardstock and accessories. You can't go wrong - and it's simple to make a beautiful card. :0)
This card took literally less than 10 minutes to make. Easy Peasy!

Thanks for stopping by! I hope you are having a great day!

Monday, August 16, 2010

Vintage Just Believe


HELP! I can't put this set down! I love it! I stamp with it every day! LOL. You can get so many different looks by just changing the colors of the ink and the cardstock. This set is perfect for so many occasions!

So, I was browsing on this web site we have just for Demonstrators to post samples, and I saw a gorgeous card done by a fellow demonstrator, Jenny Peterson. I tweaked it a little, and here is what I came up with.

I love the vintage look you get when you do something as simple as sponging the edges and adding a button. It's the subtle little touches that make a card extra special.

Here is the supply list:

Just Believe Stamp Set
Early Espresso and Crumb Cake Cardstock
Whisper White and Early Espresso Ink
Scallop Edge Punch
Greenhouse Gala Designer Series Paper
Neutral Buttons, Linen Thread
1 1/4" Circle Punch, Word Window Punch
Stampin' Sponges

Now, I have to go clean up my stamp room! You wouldn't believe the mess in here. Being creative is sloppy business! LOL.
I have friends coming over tonight for my Open Stamp Night - they get to use all my tools and stamps. :)
I love just hanging out with the gals and chatting and stamping.
Check my calendar of events for upcoming classes, camps and open stamp nights!
I'd love to have you join us, too!

Enjoy this GORGEOUS weather!


Click HERE to place your Stampin Up! order online...24/7! Even in your jammies!

Sunday, August 15, 2010

Elements of Style Portfolio


Tomorrow I am headed out with some friend in the evening, and I wanted to make a little something for the hostess's home we are going to.

I haven't made a portfolio in quite awhile, so that is what I decided on. I reached for my favorite, Elements of Style (again). I think it may end up in the LOVE FOREVER and TIMELESS Category along with Roses in Winter. :0)

Anyway, I spent most of today playing around and water coloring these beauties. I get a little lost in my own world with Aqua Painter in hand...LOL. I could do it for hours.

Here is the portfolio closed.


And here it is open with the cards on the inside.


I used the Early Espresso stripped ribbon to tie it closed. I love that ribbon. It is super quality and ties beautifully!

Here is a close up of the watercolored roses. So pretty!


Inside are 4 cards. I created two different designs.


I have had someone ask me if I would do a class on this. I guess I would if there were interest.
So readers....is this something you would like to attend a class for? If so, leave me a comment or email and I will get it scheduled if the interest is there.

Thanks for stopping by today! I hope you had a great weekend.
And if you haven't signed up for any Christmas classes yet, don't delay. Most of them only have 2 spaces left!

Stamp Happy ~